Showing posts with label YouTube. Show all posts

Wednesday, September 21, 2011

Tea Bag Holder Card Tutorial for The Kraft Journal

     It's my week to do a tutorial at The Kraft Journal and I'd like to share with you some instructions for making a tea bag holder card like the one you saw in my post last Friday.  You can find all different types and shapes of cards out there to give little gifts of yummy tea bags in.  For this particular shape I saw a couple of examples, but no measurements except the card base, so I decided to share all the measurements I used with you.  Of course these can be adjusted in any way you need.
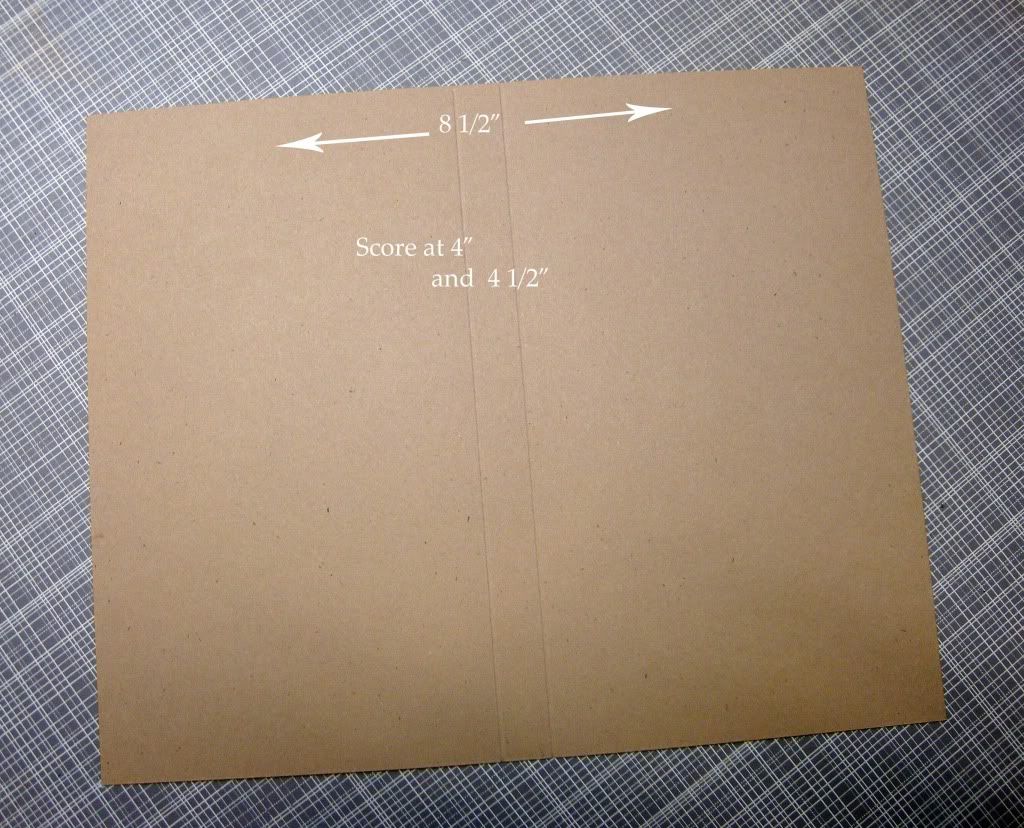
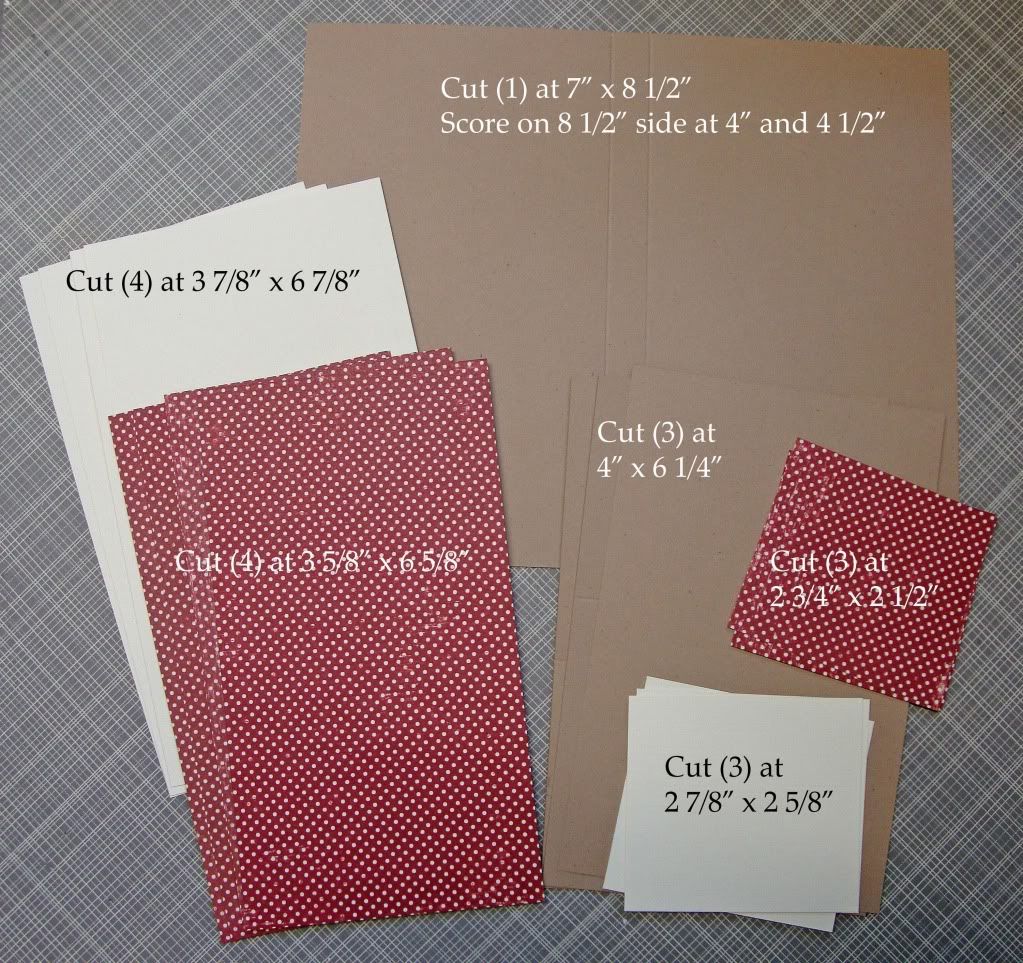
     For my project I started with a base card cut from Brown Kraft Cover Weight cardstock at 7" x 8 1/2".  That piece is scored at 4" and 4 1/2" on the long side.  I also cut (4) mats from Buff Ivory Cover Weight cardstock at 3 7/8" x 6 7/8" and (3) at 2 7/8" x 2 5/8".  My designer paper mats were cut (4) at 3 5/8" x 6 5/8" and (3) at 2 3/4" x 2 1/2".  Just getting all these pieces cut covers probably more than half of the construction of this project.

     Here's the card base with the score lines marked.
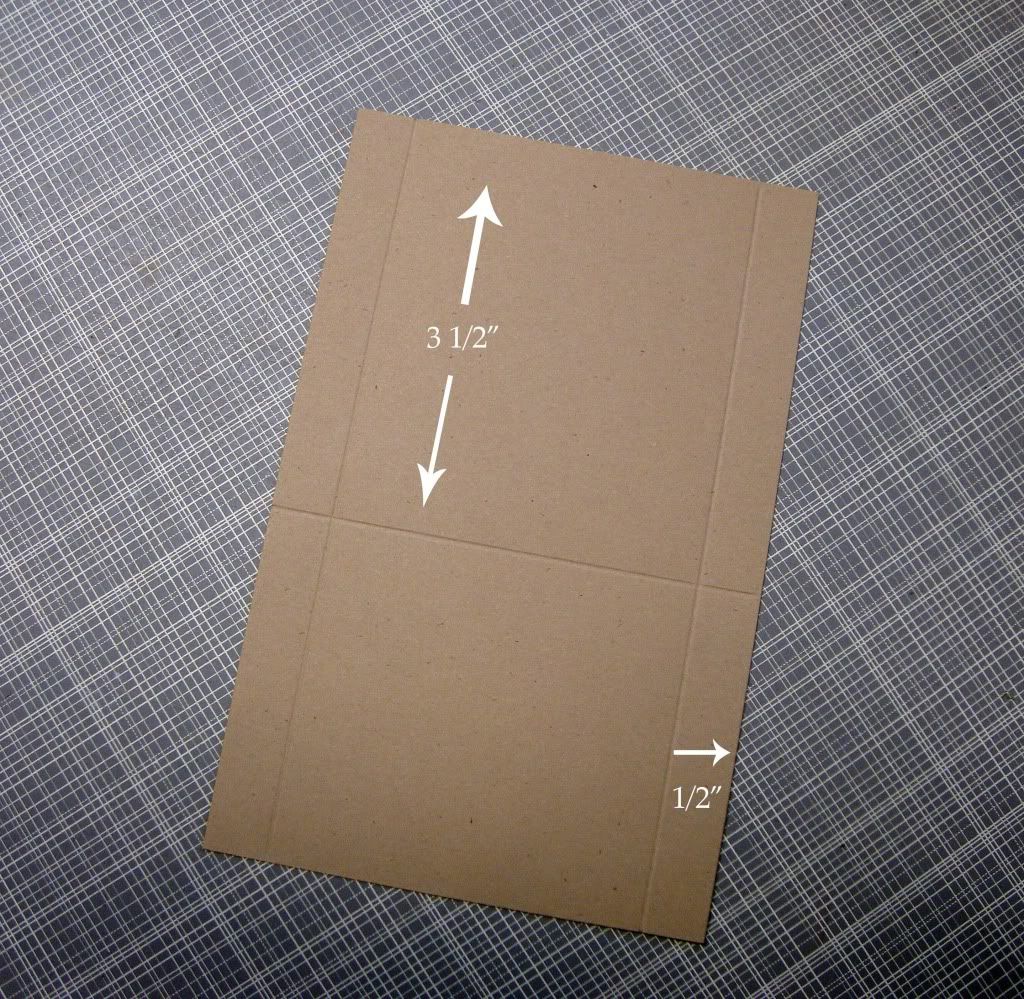
     This is one of the pockets for the tea bags.  They are cut at 4" x 6 1/4" and get scored at 31/2" and then along each side at the 1/2" mark.
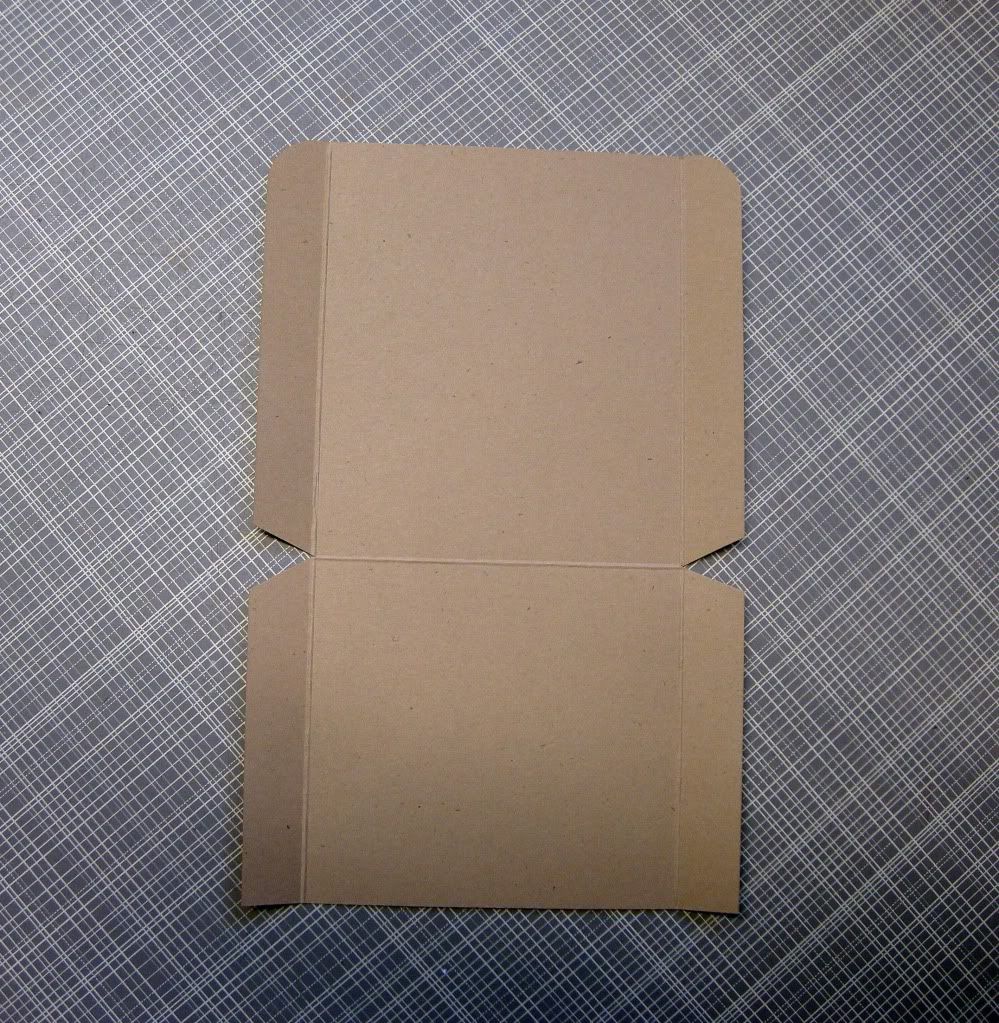
     Once you've burnished your score lines you can use a corner rounder to round off the ends of the flaps on the 3 1/2" section of the pocket.  Also use your scissors to cut a small vee out of the flaps up to the center score line.  This will cut down on bulk when folding up the pocket.
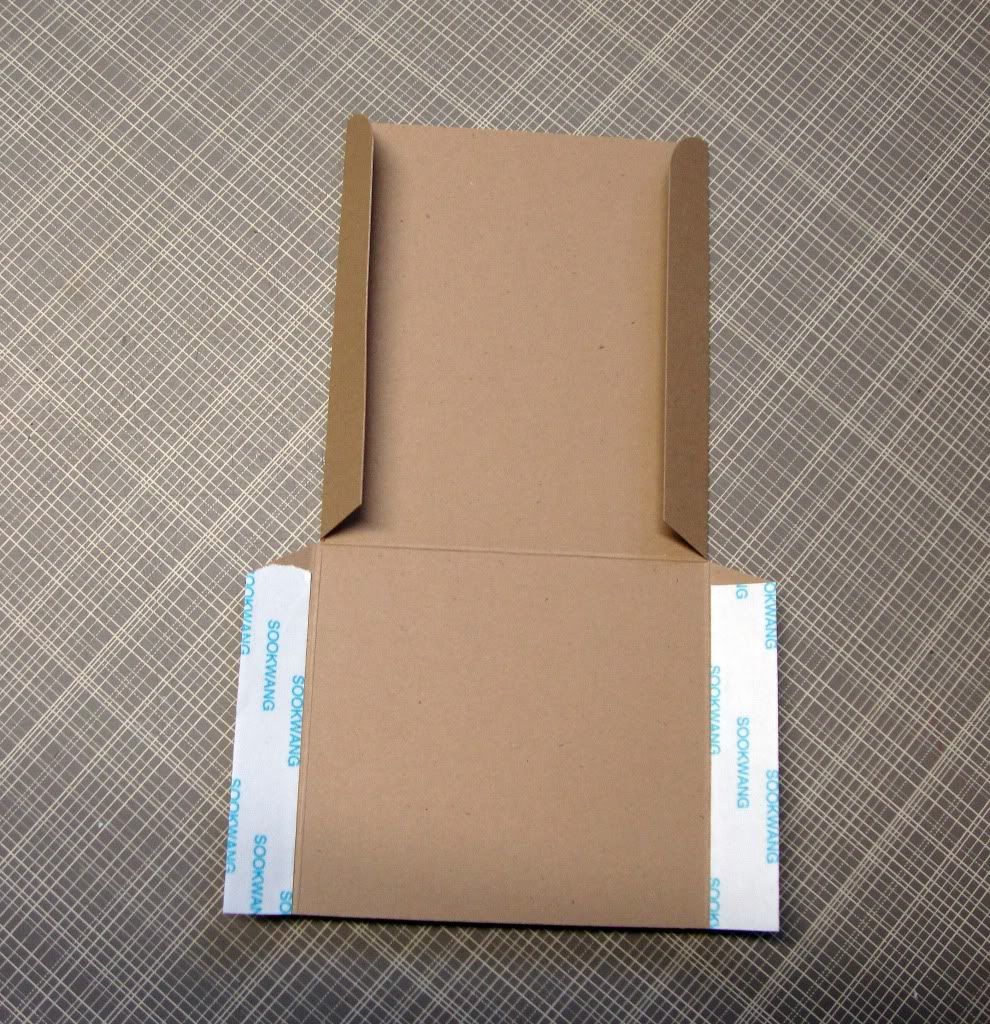
     Place some strong adhesive along the two bottom flaps.  When the bottom is folded up over the top, the flaps with adhesive will fold around to the back of the pocket.  If you will hold the center of your pocket down really well when folding those adhesed flaps over it will help keep your pocket from bulging out too badly.  When you burnish, you'll notice that your pocket might not fold exactly on the score line because of the bulk of the paper.
     These are the basic parts of the card.  Once you have all this done you're ready to decorate.  I've done a video tutorial you can watch here if you'd like to see how I attach the pockets to the card.  That would have been rather hard to photograph and explain. 
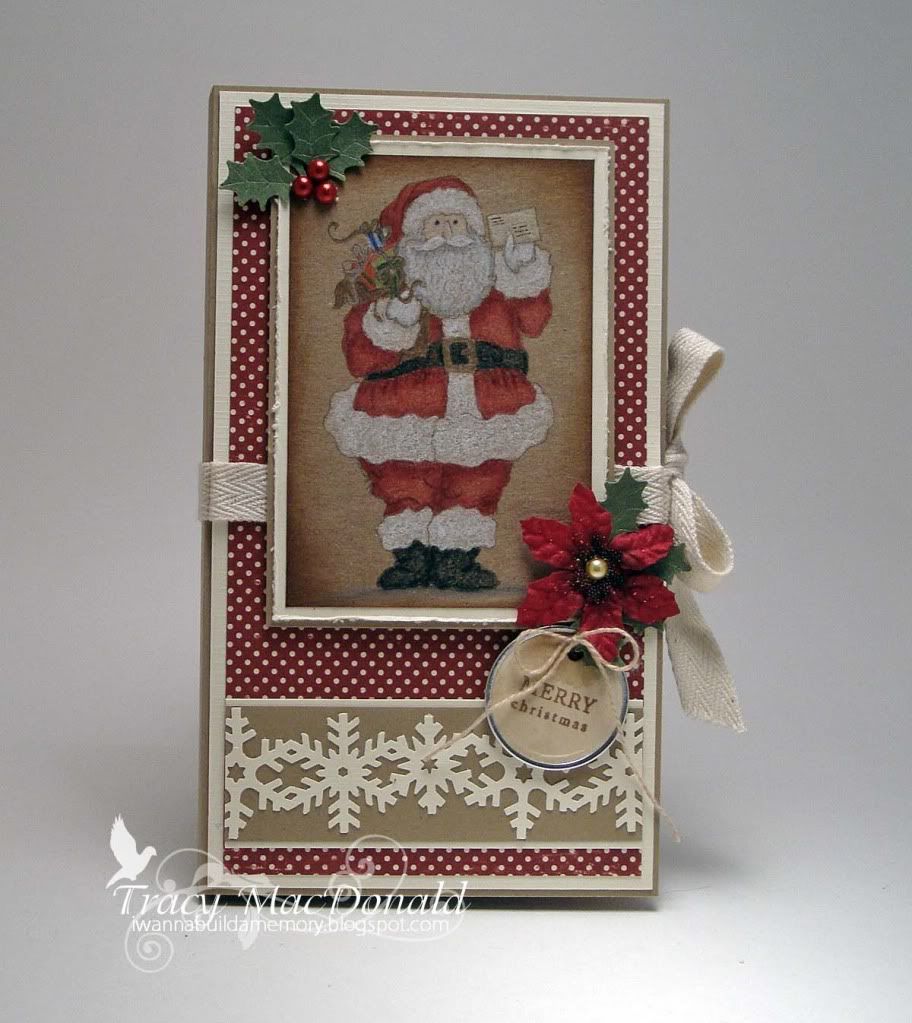
     Here's the front of my card.  I've used a digital Santa image from Isabella's Sketchbook and colored it with Prismacolor pencils on some Lunch Bag Kraft cardstock.  I've also used some Natural Twill Tying Tape and a Round Metal Edge Grungy Prim tag for the sentiment.
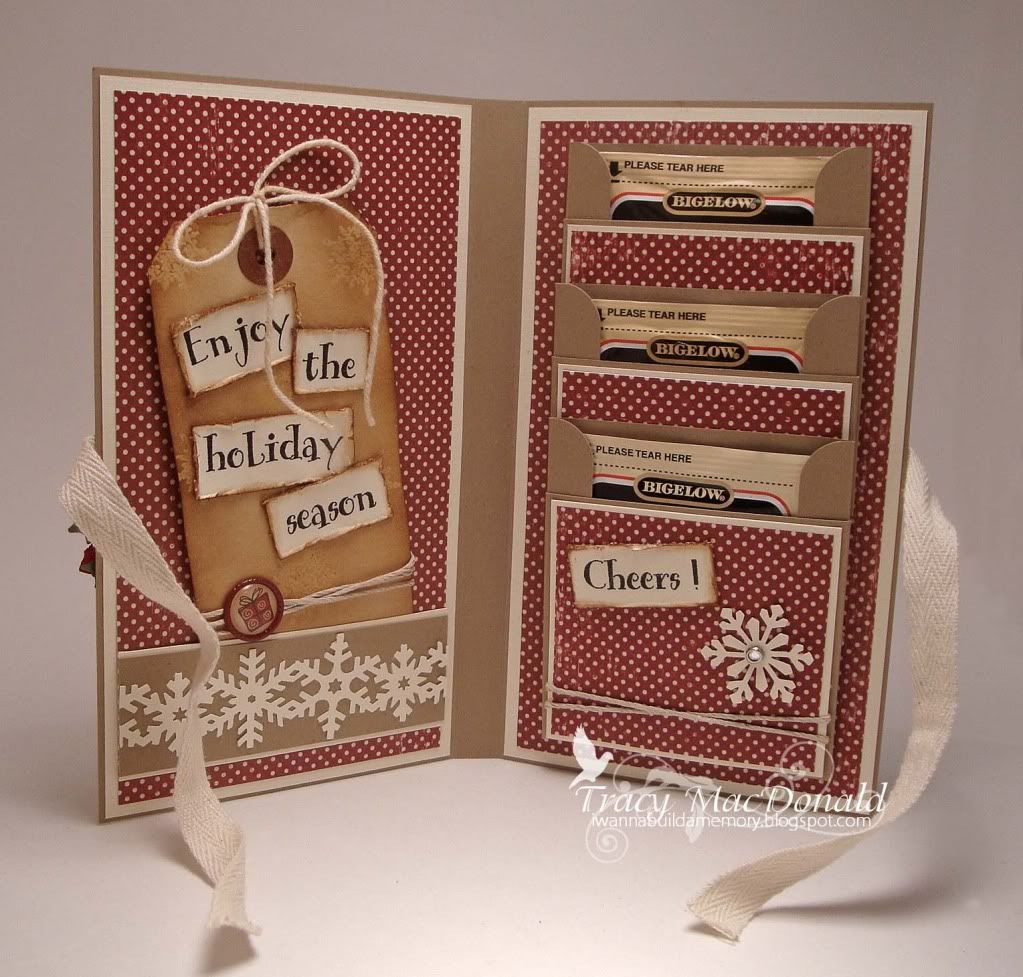
     And here's the inside.  On the first page I created a little pocket for a tag that was made using a Grungy Prim Tag.  I wrapped some Earthy Hemp Cord around the bottom of the tag and glued on an Epoxy Christmas brad that I popped the prongs off of.  The tag is inked with Vintage Photo Distress ink.  The second page has the three pockets decorated, stacked and full of tea bags.  I think this is such a fun little project and would make a great easy gift for the holidays--ANY holiday!  Instead of tea, you could make little pockets for those yummy Ghiradelli chocolate squares.  :-)
     Hope you liked the tutorial.  Have a wonderful week!


Kraft Outlet Supplies

  • Brown Kraft Cover Weight cardstock
  • Buff Ivory Cover Weight cardstock
  • Natural Twill Tying Tape
  • Round Metal Edge Grungy Prim tag
  • Grungy Prim Tag
  • Earthy Hemp Cord
  • Epoxy Christmas Brad

Other Supplies

  • Paper:  Making Memories
  • Stamp:  Isabella's Sketchbook "Santa With Letter", Papertrey Ink "Mixed Messages", Inkadinkado "Ornate Christmas"
  • Ink:  Prismacolor pencils, odorless mineral spirits, Versafine Vintage Sepia, Vintage Photo Distress ink, Versamark
  • Tools:  Martha Stewart Snowflakes deep edge punch, snowflake and holly punches; EK Success corner rounder
  • Miscellaneous:  Prima poinsettia, Recollections pearls, glass microbeads, Recollections brad, Zing Clear embossing powder

Thursday, July 29, 2010

Papercraft Star Challenge #6

Challenge #6 at Papercraft Star Challenge Blog this week is a card sketch. I used some more of the beautiful October Afternoon paper I got recently. I was going to offer some of that for my Blog Hop candy last weekend, but my buddy Jen had packed up her store for a huge crop in Natchez and it all went with her. I also broke out a new Penny Black stamp I picked up on clearance at Hobby Lobby. I haven't made any of my dryer sheet butterflies in a long loonnnggg time so I created three of those for the bottom of the card. They're colored with Olive Vine Glimmer Mist, one of my favorite colors. You can find a tutorial for how to make them on my YouTube channel.
Once this idea took root, it all fell into place and I had a lot of fun making it.

Supplies
Paper: Recollections cardstock, October Afternoon Thriftshop
Stamps: Penny Black Lace Flower, Stampabilities Felt With the Heart
Ink: Versafine Vintage Sepia, Olive Vine Glimmer Mist
Miscellaneous: Offray Dark Brown Satin Ribbon

Hope you've decided to play along with us at Papercraft Star this week. There's still time to get your entry in before the noon Saturday deadline. Make sure you pop in there after noon and before Tuesday to cast a vote for your favorite project.

Hope you like the card. Have a great day!

Monday, July 26, 2010

Paper Shoes


A few weeks ago I made a paper shoe for my friend Rina as a thank you for some goodies she sent me. I searched and searched for something unique to make for her because she is definitely a unique person. :) I lost the pictures I took of her shoe when my computer crashed, but you can see it if you're interested on her YT channel here. After she posted her video several comments were posted wanting me to do a tutorial. Wish I could take credit for this idea, but I'm not that talented. I got the idea from a blog called Artful Affirmations. She has a tutorial on her blog for the pattern and instructions for the shoes. I went ahead and made a tutorial too and created the shoe on the left (the one on the right was my practice shoe for the video). You can find my tute (parts 1 & 2)on my YouTube channel if you're interested.
I'm making several posts to my blog today so make sure you scroll down.
Have a great day!

Tuesday, July 13, 2010

Bloom Mini Album

Finally! My latest mini album is finished. This album has been one of the reasons that I haven't been playing all my usual card challenges lately. Minis take me a long, LOONNGG time. I'm really picky about how I put things together so i go through lots of ideas before I finally setlle on what each page is going to contain and look like.
I had decided that I was going to make a mini album as a giveaway prize once I reached 500 subscribers on YouTube. Well, 500 came and went and I still didn't have the album made. My friend Rina kind of summed up the way I feel about making minis. Basically she said she didn't want to just slap something together. She wanted it to have purpose and meaning. This mini had a purpose--a thank you to one lucky person who liked my work enough to subscribe to my channel so they could see more of it. I wasn't just going to throw something together willy nilly. Now I'm not trying to say I'm some spectacular crafter. I can name off quite a few ladies out there who are. Everything they make is just incredible. I just enjoy working with paper, I love to share ideas with other people, and I felt the need to make something to give back as thanks for all the encouragement and support I get. Don't get me wrong. Who doesn't love to get goodies like TH stuff, or cool papers. I just felt compelled to make something handmade to giveaway--something personal from me.
The album idea finally came together after I watched someone I subscribe to on YouTube make the flowers I used on the cover of this album. I absolutely adored the combination of Distress inks she used to make these daisies and lo and behold, when I went to Michaels (one of the numerous trips I make there each week LOL) I saw this We R Memory Keepers paper that matched perfectly. I also knew right away that I was going to use the brand new Cricut Lite Bloom cartridge that I had just bought at Wally World on this album. My Cricut has definitely been underutilized since it was bought, but I gave that little bug a work out on this album, even learned how to do some new stuff with it. :)
So here are a few of the pages. This is not the whole album. If you'd like to see the whole thing you can check out my video for it here. If you'd like a chance to win it, all you have to do is be a subscriber to my YT channel and leave a comment on the video.


For those of you who don't do YouTube and are more into card making, don't worry. I'm going to come up with a special giveaway in the future for you too. YouTubers aren't the only ladies I've learned from and been encouraged by. I follow some awesome cardmakers who are teaching me about art without even knowing it.
I'm ready to make some cards, but I also have an itch to make another mini so we'll see. At least this one won't have a time constraint on it. Whew! LOL
My new Sarah Kay and Penny Black stamps came yesterday and today I dropped by my LSS and my buddy Jen had gotten in some of those scrumptious October Afternoon Thrift Store and Fly a Kite papers. YEAH! I'm ready.
It's the start tomorrow of another challenge at Papercraft Star, so if you haven't already, check out the blog AND the Forum and give it a look see. This week's challenge is a sports theme. There's so much you can do with that theme so come on over and play along with us for this weeks challenge.
Have a blessed day!

Saturday, June 12, 2010

A Few of My Favorite Things


This week at Tag Tuesday Challenge #55 Louise challenged us to use our favorite things or things that are kind of signature items in our creations. I love making tags. They may be small but they open the door for a lot of creative imagination. This one includes some of my handmade flowers and one of my dryer sheet butterflies. You can find a tutorial on how I make these on my YouTube channel.

Here are the favorite/signature things that I included on my tag.

1. a vintage image--I LOVE any and everything vintage
2. wrinkle distress--gotta make it look old and worn
3. pink and brown color combination--these colors just make me think of something that has been loved and well worn from repeated use, like a love letter that you read over and over
4. distress ink--nothing compares to the look of distress ink
5. ribbon--love the soft touch it adds, most of my stuff has a definite feminine element to it
6. French script--this just adds a little romantic flair. You can't go wrong with anything French
7. butterflies--they just always seem to add the perfect little accent
8. my handmade flowers--anyone who's looked at my previous work knows that I LOVE to make my own flowers and I incorporate them a lot in my work. They take a lot of time but I never regret putting them on a project.

Supplies
Images: ballerina from The Graphics Fairy; French script letter from
Paper: manilla folder, copy paper, photo paper, black and white cardstock
Ink: Frayed Burlap, Walnut Stain, Peeled Paint, and Tattered Rose Distress Ink; Tsuninko Galaxy Gold; Vanilla Breeze and Creme de Rouge Glimmer
Tools: Nestabilities Classic Ovals Large (S4-110)

This was a really fun challenge. Thanks Louise!

And thanks to everyone who left me a sweet comment about my place on the Papercraft Star Design Team. If you don't know what I'm talking about check the previous post for today.
Thanks for popping in.

Wednesday, May 26, 2010

Back to my scrappin' roots

I've been so busy lately making cards that my first love of mini scrapbooking went by the wayside. I've been trying to work on this at the same time as some other projects, but it's not easy for me to multitask projects. It doesn't help that I'm slow as Christmas because I'm so particular.
This little five page album was created using the American Crafts Dear Lizzy Spring paper collection. I was drawn to it by the soft pastel colors. It wasn't an easy project for me. I LOVE my vintage shabby chic, but I think it came out cute. If you'd like to see the rest of the album you can check out my YouTube video for it.
Have a great day!

Friday, April 23, 2010

Roses and Stained Glass


This is the tag that I made for the April Tag Swap hosted by Arlene at butterflykisseswithlove.blogspot.com. The theme this month was Roses and Flowers and our challenge was to use fabric on our tag. I had this stained glass design in mind from the beginning, but the fabric was really throwing me for a loop. I had bought some burlap not long ago so I pulled that out and clipped off a little piece to use. That little snippet just seemed too little. I had thought about using sticky back canvas for the front of the tag. My sweet friend Elaine in Singapore sent me some Studio Multi Medium so that I could attempt her Rustic Wall Effect. You can check out her tutorial for this on her YouTube channel--sillyfroghoneybee. She used the sticky back canvas, but I decided to just do the technique on the chipboard. I say all that because the sticky back canvas made me think of some off white muslin material I had in storage. Then I remembered seeing a tutorial for these cute little butterflies made out of ribbon and I thought "Hey! I can make them out of that muslin and Glimmer Mist them!" So I did. LOL
If you click on the picture you can make it bigger and see the "stained glass effect" I got with UTEE. I have several other projects in mind using this look. I have a video up on my YouTube channel if you're interested in seeing how I made this tag.

Tracy

Monday, April 5, 2010

Busy Days

Whew! This past couple of weeks have been a whirlwind. Lots of good stuff going on.
I did a giveaway for my subscribers on YouTube. I don't really know much about putting kits together but that's basically what I did. I bundled up some beautiful K & Co. paper with matching embellishments. That was really fun. I liked being able to give something back to all the people who have encouraged me.
I also won a giveaway! My sweet friend Alee' did a giveaway for her subscribers and her daughter drew my name out of the bowl! So I'll be getting a beautiful kit that she put together.
I had started a mini with some of the new Dear Lizzy Spring papers but I put that on hold to concentrate on making a very special tag for my friend Steph (sweetcraftychick). She's already posted the video on the tag that she made for me but I haven't peeked. I want to be surprised. I'll post pics here soon and may do a video on how I made her tag later.
Meanwhile here's a photo of the tag that I made for Arlene's March Tag Swap on her blog--butterflykisseswithlove.


If you're interested in how I made it you can check out the two parter video I made about it on my YouTube channel. The link is on the top right hand side of this page. I tried my best to edit that video down and even with all the slicing and dicing I still came out with two ten minute segments. LOL
Does anybody know of a good place to download music to use on videos that doesn't have copyright infringements? YouTube's Audioswap selections are pretty limited.
I'm signed up for this month's swap at Arlene's too, so I've got to get busy designing!

Have a great day!
Tracy

Friday, March 19, 2010

Water Lily Beaded Tag

Hey Everybody!


Here are the closeups of the tag I did in my latest YouTube video. I'll be posting a couple of other tags using this technique shortly.


I've really appreciate the comments that some of you have left and I want to thank those of you who have recommended my channel or blog to others.


Have a great weekend!
Tracy

Wednesday, March 10, 2010

Birthday Mini

Hey Everybody! Well . . we have finally gotten a little warm spring-like weather down here on the Gulf Coast--LOTS of rain too, but I'm not complaining. If God says we need it, then we need it. LOL
Here are some photos from my lastest mini. You can check out the video for it on my YouTube channel. I just wanted to post some close ups on here in case anybody wanted to see the details on some of the pages better.
I'm a very meticulous crafter so it takes me forever to complete a mini. Now that this one's done I have a tag and an ATC swap to make projects for before I start another mini. My husband says I need to practice moderation but that's really hard to do when you love to craft like I do. I can't blame him though. I don't have a craft room so my stuff is ALWAYS all over the kitchen table, counter, chairs, computer desk . . . well you get the picture.
Hope you like the mini.
Blessings,
Tracy


Friday, February 19, 2010

Beautiful Butterflies

I don't know about where you live, but it doesn't seem like winter is going to let go of its hold here. I'm so ready for spring and GREEN! Can you tell it's my favorite season?
Since my last post I've added two new videos to YouTube and I also published them on The Scrapbeach http://thescrapbeach.ning.com/. The first one is my "Blue Mini" and the second is a tutorial on how I adapted used dryer sheets into Laura Dennison's (FollowThePaperTrail) beautiful Lutrador fabric stabilizer butterflies.

Aren't they pretty. I just love butterflies.

I plan to make another tutorial on my handmade flowers and vines when I can squeeze in the time.
Here's wishing lots of inspiration and good scrapping to you all!
Blessings,
Tracy