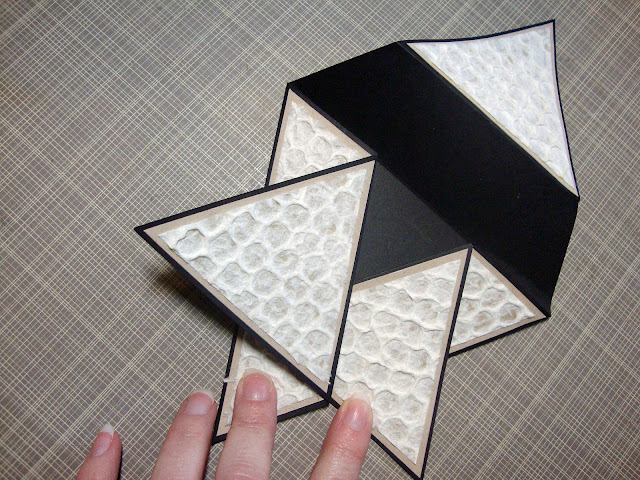
So let's get started. You'll need one sheet of 12 x 12 cardstock. I've used a cream sheet for my instructions to make things easier to see. You will first find the center of your sheet on one side. Move your ruler down a couple of inches and find the center again. Draw a light pencil line between the two marks. Next use your ruler and starting at the bottom corner, mark a light pencil line from the corner to where the 12" mark of the ruler hits your first drawn line. Do this on both sides and try to be as precise as possible. Another reason I changed to the black paper for my project is because the cream sheet was not a true 12 x 12 measurement. The black was a tiny bit larger so I trimmed it. Check your paper. It can make a difference. All three sides of your triangle should measure 12 inches.
Use your ruler to cut the two sides of the triangle so that you have the piece shown below. Once it's cut out grab your ruler again and mark each of the three sides at their center point. Using your scoring board, score between the marks as shown in the photo. You may have to adjust your paper a bit on the scoring board to get the lines straight.
Once you have your first set of lines scored you will use your ruler to measure down 2 inches from your scoring points on all three sides as shown below.
Here's how the piece will look when folded. The inner folds are valley folds and the outer are mountains.
These next two photos show you how to fold this card up. When folded correctly, it holds itself closed. Fold the right hand side flap in first and then the left hand.
For the last flap leave the left hand side on top,but pull the top corner of your very first folded piece out and tuck the right hand corner of the top piece under the flap. Your card is now closed. Since I used the bulky textured mulberry paper, my card doesn't lay as flat as it could with just another layer of decorative designer paper.
Here's a peek at the inside of the card. The "Honey Bunches" is another Meljen's image. I added the "of love" with my computer. I did a little faux stitching with a pen to carry over the design on the bee image. The mats are cut from Light Kraft cardstock. My absolute favorite!
I hope you'll give this fold a try. It's not hard at all, but it really does help to be as precise as possible with your measurements. Hope you like the card and hope to see your entry in this week's challenge. :-)
Be blessed!

Other Supplies
- Paper: Recollections, Bazzill, The Paper Studio, Copic XPress-it Blending card
- Stamp: Meljen's Designs "Honey Bee Buckets" and "Honey Bunches"
- Ink: Copics, Prismacolor Pencils and OMS, Micron pen
- Tools: Nestabilities Standard Circles Large and Classic Scalloped Circles Large, Martha Stewart Frond Punch
- Miscellaneous: Michaels flower, Recollections pearls, Crystal Stickles


21 comments:
OMGoodness, what an amazing card fold! This is awesome, Tracy!
Wow, that's an excellent card fold!! Going to have to try this one - thanks for the great show and tell :)
Oh, my gracious! This is a present within a present! What a great card! LOVE the fold and texture and your sweet little bee! Who am I kidding? I LOVE it ALL! Brilliant!
Speechless, that's what I am, Tracy! Goodness, this is over-the-top - the honeycomb texture is amazing - love it all! wendy xx
Gorgeous card Tracy,and fab tutorial!
Hugs Heidy
Brilliant ... Thanks so much for sharing this
This is indeed a fantastic fold, I've seen a few here on Dutch blogs, but never one that holds such a cute funny little bee! A bit like you she is Tracy, such a busy bee ;-) Hugs, Ira x
Wow, this is wonderful! And that mulberry paper is just PERFECT for your card! I'm definately going to give this a go, thanks so much for the inspiration!
Hugs, ali x
This is a fabulous tutorial, Tracy, I may just have to try this shaped card. Have a fun day!
What an amazing fold, Tracy! I'm in awe!!
Oh I love the card Tracy, I really will try & give it a go, don't do many shaped cards so need my horizons broadening lol! Thanks for sharing this x
Look at that. What a cool card. I just love that fold.. And that bee is to cute..
Hugs, Linda
Very cool, Tracy! Great tutorial too :)
Fabulous creation. Such clever folding and perfect honeycomb! Hugs, Lesley
This is amazing, my friend! I've never seen anything like it! Thanks so much for the wonderful instructions! I'm adding it to my "list"! :o)
Thanks for your tutorial, Tracy. I have featured your link on my blog entry for March 14. Your card is darling, and the tutorial is so easy to follow!
Tracy, this card is absolutely delightful and gorgeous!! I just love it. Your tutorial is so well done, thank you. It's my first time at your blog, but believe me, it won't be my last!
Hi Tracy, have just found your blog and have become a follower. Love the tutorial on the fancy fold card and will give it a go.
Hugs Sue W.
Hi Tracy...love your folding star card and it was so easy to follow your instructions...thank you so much...will definately give it a go :))
What a beautiful tutorial. I am yet to try this. Have pinned this to pinterest with links to this page
Cheers from Bangalore, India
Sonia
cardsandschoolprojects.blogspot.com
Hello Loved that tutorial, explained very well. Thank you so much !!!!!
Post a Comment