Showing posts with label scrapbooking. Show all posts

Friday, November 15, 2013

TSG Stampbook Saturday--Out for a ride

     Today is Stampbook Saturday at There She Goes and my last posting as this weeks Trendsetter.  First off let me say hats off to those of you who know how to photograph 12 x 12 layouts well.  LOL  Lighting and getting the page to lay flat is no easy feat and I failed miserably, but I think you'll be able to pick out the good stuff despite the bad photos.
     For my project I've created a layout using the one and only photo I have of my great grandfather.  The little guy is my grandpa.  I believe this photo must have been taken shortly after my grandpa, his mother, and brother arrived in the US in 1912 from what is now Serbia.  They arrived in New York and traveled to meet great grandpa in St. Louis.


     For my layout I started with a 12 x 12 piece of brown patterned paper.  I then proceeded to add distress ink and Glimmer mist until I felt I had created a vintage look.  I used a brick template and modeling paste to create the brick accents on the sides of the page.  My DP mats were inked and attached with machine stitching in brown.
      The vellum strip was stamped with the TSG "Henna Swirls" stamp set and embossed with gold embossing powder.  Tucked underneath it is a panel of lunchbag kraft paper stamped with the "Journal Lines" set.  I used the "Mixed Media Background Builders" to add some aging effects to the lightest DP panel.  The gears are from the "Get in Gear" set.  I blew them up to the size I needed and then traced and cut them out of grunge board.  They're embossed with distress embossing powder.
     Here's a better close up look so you can see all the details.


     Hope you've enjoyed the projects I've shared this week.  You still have time to play along with my "Thanks/Thanksgiving" challenge.
     Have a wonderful weekend!

Supplies:
Paper--K & Company "Classic K Bailey", The Paper Studio vellum, Kraft Outlet, Lunchbag Kraft, Canvas Corp Fluted Cardboard, Tim Holtz Grunge Board
Stamps:  There She Goes Clear Stamps "Henna Swirls", Journal Lines", "Get In Gear"and "Mixed Media Background Builders"; Michael's alphabet
Ink--Weathered Wood, Walnut Stain, and Old Paper Distress inks, Tattered Leather Glimmer Mist, Walnut Stain Distress Stain; ColorBox Mixed Media ink in White and Leather, Versamark, Memento Rich Cocoa, Versafine Vintage Sepia, Micron Sepia pen
Tools--sewing machine, Want 2 Scrap brick template, Spellbinders Donna Salazar Creative Page Tabs
Miscellaneous--Liquitex Modeling paste, Thickers, Vintage Photo Distress embossing powder, Ranger Antique Gold embossing powder, Tim Holtz paper clip. buttons from my stash, manila tag

Friday, April 12, 2013

TSG Stampbook Saturday

     Today I have my final There She Goes project for this week, my Stampbook Saturday creation.  Though I started out as a scrapper I rarely find the time to do it anymore so this project was a major undertaking.  LOL
     A special thanks to my sweet friend Jinny Newlin.  If you've never visited Jinny's blog and soaked up her amazing cards and scrapbook layouts you really need to pop over there.  She inspires me constantly with her amazing layout ideas.  She also helped me out with some tips for trying to get my pages photographed decently.  Not the greatest results but they're better than the first ones I took thanks to Jinny.  LOL
     I decided to do a two page spread using the photos I took on the trip my mom and I took to the local botanical gardens back in March


     Here's a closer look at the first page.


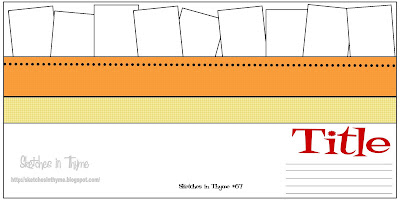
     One of the sources Jinny uses for her great layouts is Sketches in Thyme.  I was able to find one there that would let me utilize such a large number of photos and thankfully the lady in the camera department at Wally World showed me how to print them out in wallet size so they'd all fit.  Here's what the sketch looked like.


     I decided to use some wood planking for the first section to simulate wooden planters and edging.  For the next section I added some stitching and dug out my modeling paste and a chicken wire template to add some fun texture.  I used three of the sentiment stamps from the TSG "Oh Snap" set on this page.  The bottom layer was made using a Martha Stewart punch.  I did it once in white and a second time in a pale blue vellum and overlapped them.


     Here's the second page.


Same basic construction with two more of the sentiment stamps, the one near the photos and the little "Date Taken" on on the ticket.  Used a Kraft Outlet tea dyed tag and added a rub on on it.  The journaling spot and the other designer paper elements are from Kaisercraft's "Utopia" collection.  I had just grabbed a mix of papers at Michaels that caught my eye color wise and the Kaisercraft papers just happened to match.  I found the Sizzix die I did the title lettering with on clearance at Mike's too.


I love these sentiment stamps.  They would work so perfectly on ANY layout.  Don't you just love versatility.  Hope you enjoyed my projects for this week.  You still have time to enter the "Blue/Yellow/Neutral" challenge if you haven't yet.  Thanks for stopping in!

Friday, February 1, 2013

TSG Stampbook Saturday

     I've had a blast being Trendsetter of the Week  at There She Goes and getting to share a few extra projects with you.  Today's project was my hardest by far, which makes no sense at all when I started out scrapping before card making.  Gotten a bit out of practice, but I managed to put together a page to share with you that features stamps from the A Little Treat and Bon Appetit sets.  I combined the images to make a couple of chefs to represent my baking buddy and me.  Don't think your eyes are going bad cause I blurred our faces a bit for privacy.  This is a 8.5" x 11" page and the images are colored with Copics.


     I didn't get too fancy.  I used a punch around the page Martha Stewart set for the bottom mat and  Tim Holtz On the Edge die for the blue scallop.  The letter of Maddie's name were chipboard pieces which I covered with DP and Glossy Accents.  I should have fancied up the banner a bit more, but the old crafty brain cells were giving out on me.
     Thank you for all the lovely comments you've left this week on my projects.  I really appreciate all your support.  Hope you enjoyed the week as much as I did.

Wednesday, May 18, 2011

A Baby Girl Mini

WARNING!!  Photo heavy!!

    If you're a follower you probably remember the card I made a few weeks ago for my daughter's boss who is expecting her first child.  Well this is the mini album I made to go with the card.
     As you can see it's a girl and her name is going to be Ansleigh.  The entire album is made with DCWV's Nana's Nursery papers.  I used a chipboard album for the base.  All the pages have hand stitching and inking around the edges.
     For the cover I made all the flowers.  Some are inked, some are Glimmer Misted and rolled, and some are Glimmer Misted seam binding.  The ribbon slide is chipboard covered in Crackle paint.  I crocheted the butterfly and gave him a bling trail.  The baby shoes were created from a pattern I found here.  I resized them for the cover.  There are some bead charms I made and some pieces of fun fibers tied to the book ring.
     For the first page I cut stars with a Sizzix die from a sheet of fleece I found at Hobby Lobby.  I thought it was felt at first.  It's soooo soft.  I added some buttons with embroidery thread, some fibers, and a cute ticket stub.
     Page two has double postage stamp frames cut from a Sizzix die and covered in Crackle paint.  There are some more rolled roses and a couple of little chipboard pieces covered in paper and decorated with some Cosmo Cricket rub ons.
      For this page I found the dress image online and printed it out to make a template.  The flowers are punched and inked and the sentiment is on another little chipboard piece.  Isn't that little duckie by the flowers cute!  He's a button I cut the back off of.
     Page four has a large photo mat tucked behind some fleece flowers.  The banner was created with a Nestie die and strung on some embroidery thread with pearl spacers.
     Page five is a punched flower frenzy.  I made the bib by cutting out an oval with a Nestie and then cutting out the neck with a circle Nestie.  I ruffled some pink ribbon and covered the neckline with some more of it.
     For page six I used some more punched flowers and cut the frame out with a Nestie die.  The butterfly is a MS punch and I gave him a pretty bling trail too.  He has embroidery thread antennae.
     You can't have a baby album without a diaper in it!  I found the pattern here.  I wanted it to have the feel of a cloth diaper so I covered the paper with some thin cotton fabric which made it so easy to add those little "diaper" pins.  The lace has a pretty white ribbon run through the middle, but I found some matching green fiber in my stash and ran that through on top of it.  There's another handmade flower too.
     Page eight was the hardest page.  Not because it was all that difficult, but because I kept cutting it wrong.  I wanted to keep the little animals from being covered so I decided to make the page a pocket.  I cut the paper along one of the pattern lines and added a little lip of cardstock to help make the pocket opening easier to find.  The two tags just slide right in.  I added some ABC buttons on some little fleece flowers and ruffled some more ribonn which I added on top of a pretty piece of lace.
     And here's the back cover.  I found a sweet Helen Steiner Rice poem and added my name and the date by gluing on a piece of acetate I printed out the info on.
     I hope you like the album.  I think I'll give it a whirl in a few challenges.
Top Tip Tuesday--one for the kids
Digi Design house--anything but a card
Inspire Me Fridays--anything goes
Divas By Design--one for the girls
My Mum's Craft Shop--anything but square
Have a blessed day!

Tuesday, May 17, 2011

Papercraft Star Challenge #46


     This turned into a two day project!  Not that it was hard, but I just couldn't get my idea to solidify.  Well here's the end result.  Papercraft Star's challenge this week is a sketch one.  I decided to try out another 12 x 12 layout and I picked one of my favorite subjects to scrap, an ancestor.
     This is about my great-grandfather.  I have to admit I'm a little obsessed about the man.  He died the month before I was born and I'm so sorry I never got to meet him.  Everybody, and I mean EVERYBODY talks about how wonderful he was.  He never had much cause he gave it all away to help other people.  The one thing he managed to hang onto is the old homestead I live on.  It's been in the family ever since he bought it almost 100 years ago!
     This photo is of one of the boats that he worked on.  I'm not sure if he designed this particular one, but it's highly likely.  He built boats for people all along the Gulf Coast.  My uncle has tons of photos of TONS of his boats and I even have some of his design blueprints around here somewhere.  For the tag, I found one of his little notebooks and copied a page that he had written a bunch of measurements on for a boat he was building for someone in Port Sulphur, Louisiana.

     For a little added interest I bought a piece of balsa wood at Michael's cut it into lengths and pieced it together to simulate the building of the boat.  I used some teeny tiny brads for the nails.  I found a few of his old work badges in a box and copied one twice.  I cut the photo out of one and sandwiched a  piece of acetate between the two to mimic the original badge.
     The base paper was sprayed with Glimmer Mist after I attached the big Tim holtz mask.  After it dried, I went around the mask with a little Fired Brick Distress ink to carry over the red matting into the background.
     So let us see what you can come up with for this sketch challenge and get your project linked up by 9:00 p.m. EST on Sunday for a chance at this months Grand prize sponsored by The Paper Trail.
     Have a great week!


Supplies


Paper:  Recollections, Coordinations, My Minds Eye Stella and Rose, The Paper Studio, Bazzill, Georgia Pacific cardstock and copy paper, Kodak photo paper
Inks+:  Tattered Leather Glimmer Mist; Fired Brick, Walnut Stain, and Vintage photo Distress ink; Sakura Sepia Micron pigment pen
Tools:  Exacto knife, sewing machine, Cropadile, Nestabilities Labels Two (S4-162), Tim Holtz mask
Miscellaneous:  balsa wood, Recollections brads, acetate, jute

Thursday, September 16, 2010

Papercraft Star Challenge #13

It seems like forever since I've made a scrapbook layout, but I had the opportunity to do it this week using Beth's great sketch for the challenge at Papercraft Star.
My family is very anti-personal photos on the net, so you won't find anything on my blog using pics of us. However, I am the official heirloom photo collector of both my family and my husbands' and I don't mind posting those. This layout uses some pictures of my grandmother that I believe were taken shortly before or after her marriage in 1938.
For my layout I made a title using some really cool paper. I found it at Michals and it's called Canvas Paper. It's literally like a piece of canvas for painting, but it's very flexible like a sheet of paper. I love the texture and inked it up with some distress ink. The letters were cut out using my Cricut and then layered onto white and then black cardstock, both of which were roughed up around the edges. I learned this technique a while back from an incredible crafter named Teresa Manchas. She has a tutorial for it on her blog Scrap This.
I added some chipboard pieces that I covered in paper, sanded, and inked. The banner is handcut. I don't have a single Cricut cart with a triangle shape on it. Drats! Anyway, the letters were stamped and embossed and I used my Crop-A-dile to punch holes to thread the string through. The string is just a piece I had leftover out of an office tag. The doily was cut to fit and it's edges were inked. I found these long rectangular ones at Dollar Tree. The flower at the top is actually three Prima flowers. Two are folded into quarters and glued into the center of the third.
At the bottom, I covered a chipboard heart in paper and then inked it. I then covered it with Versamark and UTEE. After about the third layer of UTEE I pressed a rubber stamp into the UTEE and let it cool. The flowers at the bottom are chipboard. I took a piece of white cardstock and ran it through a paper crimper in several different directions. It gave it a cool texture and then I inked them with Distress inks and misted them with water to meld the colors.
I've really had the itch to make a new mini album lately, and I even have the papers and some embellies bought for it already--My Mind's Eye Lost and Found. FABULOUS papers! Maybe I'll find a spare minute to get started on that.---ROFL!

Here's the list of supplies I used to make this page.

Paper: Bazill, My Mind's Eye Twenty-Ninth Street Market, Recollections and Great White cardstock, Strathmore Canvas paper
Stamps: Martha Stewart Alphabet clear stamps, Stampabilities Field of Flowers
Inks+: Weathered Wood, Shabby Shutters, Tumbled Glass, Frayed Burlap, and Vintage Photo Distress inks, Stazon Jet Black, Zing Clear embossing powder, Ultra Thick Embossing Enamel
Tools: Circut, Botanicals cartridge, Martha Stewart Layered Arches edge punch, Crop-A-dile, Fiskars Paper Crimper
Miscellaneous: chipboard pieces, Prima flowers, Making Memories ribbon and journaling tag, paper doilies, Michaels $1 bling


This project was a lot of fun and now I have another page finished to add to my heritage album. You have until 12:00 p.m. EST tomorrow to get your entry submitted at Papercraft Star. Hope you decided to play along with us this week. If not, we have a new challenge already scheduled for next week so you can start working on it now. We love to see our familiar regulars and all our brand new subsribers joining in the fun too!
Don't forget! If you aren't a follower of Papercraft Star, you can join now and be entered into a drawing for a $25.00 gift certificate to either Papertrey Ink or My Favorite Things. Check out all the details here. The drawing is Friday at noon EST so make sure you've joined and commented before that deadline.
Have a wonderful blessed day!

Tuesday, July 13, 2010

Bloom Mini Album

Finally! My latest mini album is finished. This album has been one of the reasons that I haven't been playing all my usual card challenges lately. Minis take me a long, LOONNGG time. I'm really picky about how I put things together so i go through lots of ideas before I finally setlle on what each page is going to contain and look like.
I had decided that I was going to make a mini album as a giveaway prize once I reached 500 subscribers on YouTube. Well, 500 came and went and I still didn't have the album made. My friend Rina kind of summed up the way I feel about making minis. Basically she said she didn't want to just slap something together. She wanted it to have purpose and meaning. This mini had a purpose--a thank you to one lucky person who liked my work enough to subscribe to my channel so they could see more of it. I wasn't just going to throw something together willy nilly. Now I'm not trying to say I'm some spectacular crafter. I can name off quite a few ladies out there who are. Everything they make is just incredible. I just enjoy working with paper, I love to share ideas with other people, and I felt the need to make something to give back as thanks for all the encouragement and support I get. Don't get me wrong. Who doesn't love to get goodies like TH stuff, or cool papers. I just felt compelled to make something handmade to giveaway--something personal from me.
The album idea finally came together after I watched someone I subscribe to on YouTube make the flowers I used on the cover of this album. I absolutely adored the combination of Distress inks she used to make these daisies and lo and behold, when I went to Michaels (one of the numerous trips I make there each week LOL) I saw this We R Memory Keepers paper that matched perfectly. I also knew right away that I was going to use the brand new Cricut Lite Bloom cartridge that I had just bought at Wally World on this album. My Cricut has definitely been underutilized since it was bought, but I gave that little bug a work out on this album, even learned how to do some new stuff with it. :)
So here are a few of the pages. This is not the whole album. If you'd like to see the whole thing you can check out my video for it here. If you'd like a chance to win it, all you have to do is be a subscriber to my YT channel and leave a comment on the video.


For those of you who don't do YouTube and are more into card making, don't worry. I'm going to come up with a special giveaway in the future for you too. YouTubers aren't the only ladies I've learned from and been encouraged by. I follow some awesome cardmakers who are teaching me about art without even knowing it.
I'm ready to make some cards, but I also have an itch to make another mini so we'll see. At least this one won't have a time constraint on it. Whew! LOL
My new Sarah Kay and Penny Black stamps came yesterday and today I dropped by my LSS and my buddy Jen had gotten in some of those scrumptious October Afternoon Thrift Store and Fly a Kite papers. YEAH! I'm ready.
It's the start tomorrow of another challenge at Papercraft Star, so if you haven't already, check out the blog AND the Forum and give it a look see. This week's challenge is a sports theme. There's so much you can do with that theme so come on over and play along with us for this weeks challenge.
Have a blessed day!

Friday, July 9, 2010

Papercraft Star Challenge #3

This week's challenge for Papercraft Star was the sketch above.

I have to say I struggled with this one. It's been a long--long time since I've done a 12 x 12 layout, and I don't think I have ever put this many photos on one page. LOL I chose to use photos of flowers from around my yard and a couple from my mom's too. Crepe myrtle, wisteria, pear, azalea, hydrangea, turks cap lily(we always call this a tiger lily which is silly since tigers have stripes not spots LOL), day lily, gardenia, and gerbera daisy flowers make up the page. The page is very simple with matted photos, a Cricut cut sentiment from one of the new Cricut Lite cartridges, and some fancy cuts from the Storybook cart that I painted with some Perfect pearls in jewel tones. I also painted the sentiment with some black puff paint for a little texture, and added a stamped butterfly.

Supplies
Paper: Bazzill, white cardstock
Stamp: Martha Stewart butterflies
Inks etc.: Perfect Pearls, Stazon Black, Scribbles Black 3-D paint
Tools: Cricut, Cricut Lite Bloom cartridge, Storybook cartridge

Submissions for this challenge will be taken until 12:00 p.m. (EST) Saturday, July 10, after which voting will be opened to the public through Monday July 12. This sketch lends itself to such a great opportunity to scrap a memory you've captured in a series of photos (wish I'd had that--LOL). So dig out those photos, scrap that layout, and come enter it in our challenge. We'd love to see what you can create from this sketch.

Have a great day!

Wednesday, May 26, 2010

Back to my scrappin' roots

I've been so busy lately making cards that my first love of mini scrapbooking went by the wayside. I've been trying to work on this at the same time as some other projects, but it's not easy for me to multitask projects. It doesn't help that I'm slow as Christmas because I'm so particular.
This little five page album was created using the American Crafts Dear Lizzy Spring paper collection. I was drawn to it by the soft pastel colors. It wasn't an easy project for me. I LOVE my vintage shabby chic, but I think it came out cute. If you'd like to see the rest of the album you can check out my YouTube video for it.
Have a great day!

Tuesday, April 13, 2010

Another Heritage 12 x 12 Layout


Here's another one of the heritage layouts I did last year. My great-grandmother is also in this one. She's the little girl on the bottom left. It was taken in the early 1890's. Her mother is sitting behind her. I just love old photos and stories about my ancestors. I'm a huge genealogy buff although I haven't really fooled with any of that in a while.
For this layout I printed out another frame pattern. It also had a design on it, but for this one I used a stylus to trace over the pattern which raised it up on the opposite side. I then inked the piece and the raised edges caught more ink and defined the design.
The rose was an image off the internet. I printed it out three times and cut the print outs up so that I could layer the image. I then covered the whole thing with Rock Candy Crackle Paint. Just a note of advice here. DO NOT use crackle paint on matte finish photo paper. Once the crackle crackle it started to fall off and it took the ink with it. After I put that whole thing together I had to redo it on regular cardstock all over again.
The flourish on the right hand side was done with a piece of acetate and some dimensional puff paint. I found a flourish image online and blew it up to the size I needed. I then put it under the acetate and used it as a guide to make the paint dot pattern.
The paisley background paper was cut out using a piece of die cut cardstock and then I cut around it with scallopped decorative scissors. I then went back with a paper piercer and poked holes in every one of those little scallops. Yikes! That was a job!
Hope you like it. Thanks for popping in.
Tracy


Sunday, April 11, 2010

A Little Something Different


It's been forever since I did a 12 x 12 layout. The last project I was working on was a heritage style album of old family pictures. Here is one of the pages I created with a picture of my great-grandmother. She was a playmate for me when I was a kid. We spent hours playing dominoes and card games like fish and war.
All the flowers, stems, and even the vase are handmade. Those stems were some of my first attempts and they use the same technique as the one I use in my vines and stems tutorial on YouTube. The leaves were hand cut and inked. The vase made me use my brain. I didn't want it to be flat so I made a back and a front AND a lip for it so the stems could actually be "inside" the vase. It was also run through a Cuttlebug Embossing folder and then Glimmer Misted with Caramel Apple.
I also made the frame. I found an image of one either off the net or from my Printmaster clipart, printed it out, glued it to chipboard, and cut it out. The print out had a design on it. I used glue to go over the design lines, let it dry and then painted over it with black acrylic paint. After it dried, I took a little bit of gold paste similar to Rub and Buff and brushed it lightly over the raised lines.
I need about ten clones of myself right now to be able to do all the projects I want to do. So many ideas floating around in my head that I want to try not to mention the things that I have obligations to do. I hope to have a couple of new tutorials up soon on YT. My friend Steph wants me to do a tutorial on the tag I made for her. Here's a pic of it


and here's a pic of the tag she made for me. I LOVE IT!


I actually bought a package of blank cards and envelopes so I can give card making a try again. Maybe, just maybe I'll have a card worth showing you in the future.
Thanks for stopping by!
Tracy


Wednesday, March 10, 2010

Birthday Mini

Hey Everybody! Well . . we have finally gotten a little warm spring-like weather down here on the Gulf Coast--LOTS of rain too, but I'm not complaining. If God says we need it, then we need it. LOL
Here are some photos from my lastest mini. You can check out the video for it on my YouTube channel. I just wanted to post some close ups on here in case anybody wanted to see the details on some of the pages better.
I'm a very meticulous crafter so it takes me forever to complete a mini. Now that this one's done I have a tag and an ATC swap to make projects for before I start another mini. My husband says I need to practice moderation but that's really hard to do when you love to craft like I do. I can't blame him though. I don't have a craft room so my stuff is ALWAYS all over the kitchen table, counter, chairs, computer desk . . . well you get the picture.
Hope you like the mini.
Blessings,
Tracy


Wednesday, February 10, 2010

Garden Mini Album

Hi Everyone!

This post includes pics of a mini album that I made for my best friends birthday back in December. I got the idea for the cover from a blog by Nathalia Castellon at http://funkyphreshpapierkreations.blogspot.com/2007/07/garden-gate-mini-album-tutorial.html. Sorry for the blackout spaces but I forgot to take pictures before I put photos in her album.

Let's get started!

The cover is made with chipboard "fence slats" that I painted with purple and white acrylic paint and crackle medium. I made the roses and hand cut and colored the bird. The ladybug is a sticker and the butterfly was stamped on card stock and colored with Prisma colored pencils and odorless mineral spirits. I printed the leaves out on my computer from a dingbat font that I downloaded and then hand cut them and added their details. There's a metal keyhole and silver brad "nails". The album is bound with two bookrings and they have fibers and ribbon tied to them as well as a couple of charms hung by garment pins that I alcohol inked silver.

The paper I used in this mini is from Basic Grey's Porcelain collection. The inside cover has a handmade vine and the flower and leaves are from a Nestabilites die.. The first page has some Prima flowers. The center flower is made with the Velma technique. The sentiment is printed out on a piece of acetate.

The house, pole, vine, leaves, and grass are all handcut and pieced. The little flowers are tiny Primas that I folded in fourths.

This page has another handmade vine. The leaves were punched with a Martha Stewart punch and colored with ink. The flowers are more folded Primas and their bottoms are small Prima flowers also. The bottom panel is a torn strip of paper colored with Tattered Rose Distress ink and some Old Lace Glimmer Mist. The "FAMILY" tag was cut with a Nestabilities die and inked with Vintage Photo Distress ink. The bird is an Inkadinkadoo stamp that is colored with Prismas and the OMS and adhered with pop dots.

This page has a scrunched ribbon with some glass chunk beads sewn to it. The birds are from the same Inkadinkadoo stamp and the sentiment is printed on acetate. The tree is made from a Tattered Angels Glimmer Screen that I ran through my Wizard and then cut out. It's painted with Olive Vine and Tattered Leather Glimmer Mist.

Another bird from the same stamp set. He was stamped with Versafine Vintage Sepia ink and he's covered with Glossy Accents. His branch was cut with my Cricut and inked with Memento New Sprout ink. The birdbath is handcut, colored with Prismas and OMS and the bowl is filled with Waterfall Stickles. Some more handcut grass too.

On this page I handcut the tree trunk and then ran it through my Wizard in the Cuttlebug Distressed Stripes Embossing folder. It's colored with Weathered Wood Distress ink. The "leaves" are made with a Martha Stewart Hydrangea punch and they are colored with Olive Vine Glimmer Mist.

Another birdhouse that is handcut and pieced. It's colored with Vintage Photo and Black Soot Distress ink and Memento New Sprout.The hearts are strung on a piece of black embroidery thread and they are covered in Cotton Candy Stickles. The opening is covered in Scattered Straw Distress Stickles.

This is the puppy page. The Dogs Rule sign was printed from my computer. The dots on the letters are made with Scribbles White Mist 3D paint and inked with Tattered Rose Distress ink. The flag pole, fence, and leaves are handcut and the vine is handmade. It's decorated with small Primas with bling centers. The flag was cut with a Nestabilities die and the crown with my Cricut. It's "jeweled" with Stickles.

The last page includes a scripture that I printed from my computer and pieced. The irises are some stickers that I found at the Dollar Tree way back. The bird cage is painted onto acetate with the same Scribbles paint.

The back cover has a flourish that I cut from chipboard on my Cricut. It's covered in Shabby Shutters Crackle Paint and decorated with some Primas with bling centers and a chipboard butterfly cut from my Cricut. He's edged with Vintage Photo and stamped with Vintage Sepia. The black part of his body was done using Marion's(APieceofCraftdotcom) technique with puff paint and UTEE. His wing is covered in UTEE also.
Well, that's it. I had so much fun making this one because of all the handmade stuff. I'd rather make it than buy it if I can. I have one more mini that I made for a friend for Christmas before I decided to video, so it will be up next here and I am working on my next video mini now. I can't spit them out very fast because I'm such a perfectionist or detailist, whatever you want to call it. LOL.
Hope you liked my Garden Mini. Leave me a comment if you can. I'd love to know what you think.
Blessings,
Tracy