Showing posts with label tutorial. Show all posts

Tuesday, September 9, 2014

Playing with embossing paste


     Hello friends!
     Today I have a little tutorial for you that I will be sharing over at Bella and Bronte's Clubhouse on FB.  It's super simple and probably something that you've seen a million times, but Mo has SOOOO many cute images with cakes and cupcakes on them that you could easily apply this technique to and spice up your card a bit.
     I'm starting with the adorable Cupcake Hamster and coloring him/her with Copics.


Copics Used:
hamster E31, E33, E35, E93, E95
cupcake Y11, Y21, YR21, YR23
cupcake liner BG000, BG01, BG02, BG05

Once I finished coloring my image I decided what color "icing" I wanted for my cupcake and grabbed some Worn Lipstick Distress ink, embossing paste, and a palette knife.


     I gave my Distress ink pad a good smoosh on my craft sheet and then added a scoop of embossing paste to it.  (This was a bigger scoop than was needed).


Begin working the ink and paste together until you get..............


     THIS!  Doesn't it look like the most delicious decadent icing!


     I applied most of it with the palette knife and then used a toothpick to get into the nooks and crannies.


     The image has sprinkles on it and I decided to add those with some dots of gold paint.  You could use beads (I couldn't find mine), sequins, pearls or whatever to decorate your cupcake or even just leave it plain.  I just love the added texture and how real it looks.


     And here's my finished card.  A CAS design with a bit of washi tape and a few sequins to bling it up.


     Hope you enjoyed the tute.  Nothing earth shattering, but maybe it will inspire you to add a bit of texture for fun next time you use one of Mo's cake/cupcake images.
     Have an awesome day!

Supplies:
Paper--Copic XPress-it Blending card, Bazzill, Georgia Pacific
Stamps--Mo's Digital Pencil "Cupcake Hamster", sentiment from There She Goes Clear Stamps "A Little Treat"
Ink--Worn Lipstick Distress ink
Miscellaneous--Wendy Vecchi embossing paste, Polymark Medium Gold Fabric paint, washi tape, sequins

Thursday, November 21, 2013

Christmas planner


     Are you in the mood for Christmas yet?   Our wonderful Cathy has challenged us to come up with an "Anything but a card" project for this weeks challenge at Mo's Digital Pencil.  I've seen several of these Christmas planners created from a plain old manila file folder and decided to try it out.
     For the cover I've used the adorable "Little Elf Kit".  All my papers are from an older K & Company Christmas pad.
     When folded the planner has four nice pockets for holding your Christmas to dos.  I've added some printable lists that can be found here.


     The last pocket hold a handmade envelope for keeping track of receipts or coupons.


     I added some velcro to my ribbon for the closure.


Here is a pictorial tute on how to construct the planner.


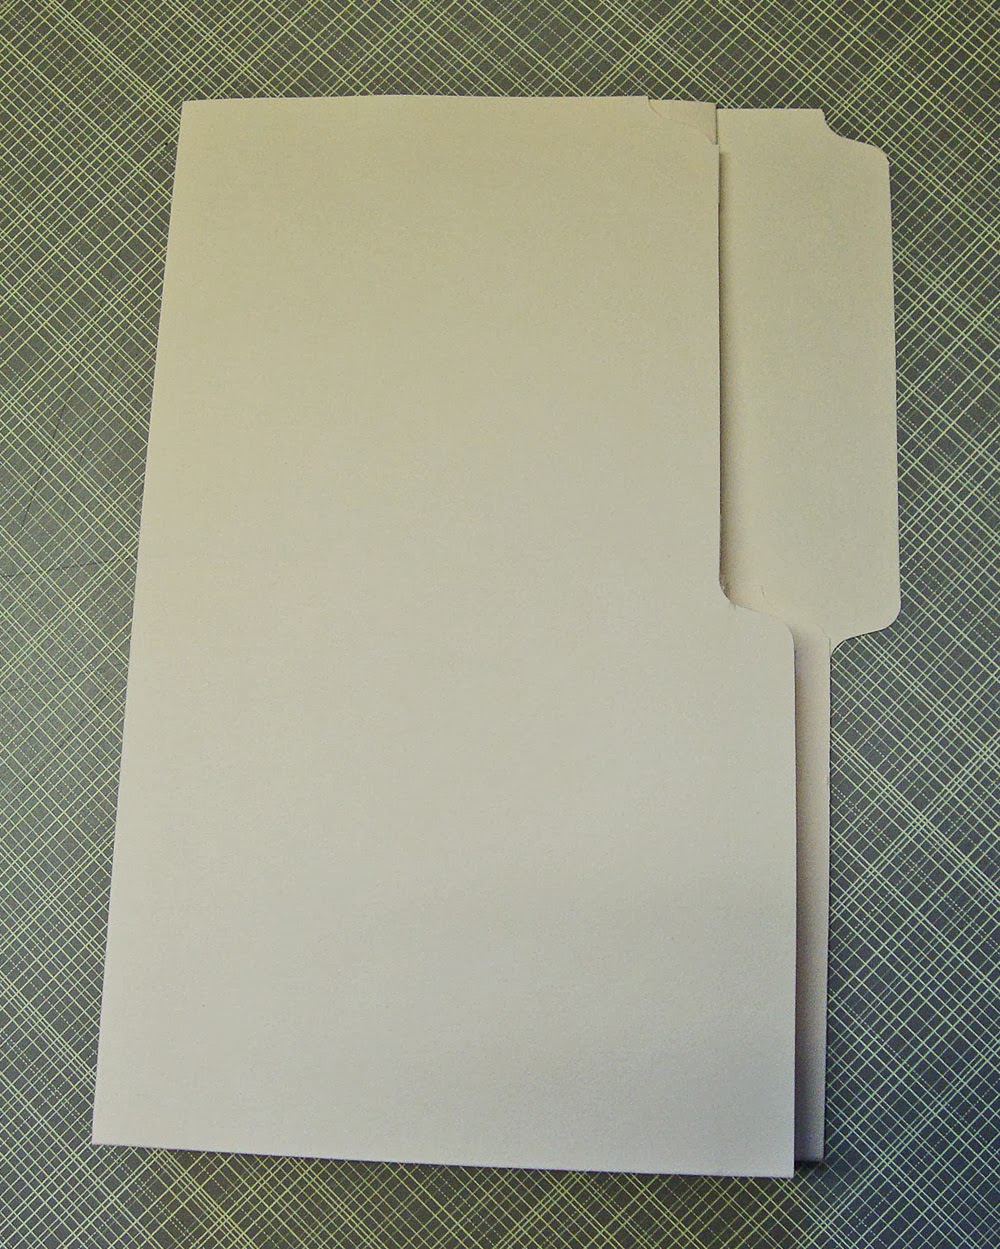
1.  You need one manila folder.  To have the tabs in the position shown on my planner you need to use a folder with the left hand tab.


2.  Open the folder with the tab in the upper right hand corner.  Fold the bottom of the folder up until the rounded corners meet on the left hand side.  Use a bone folder to smooth all your folds.  The photo below shows what this should look like on the left hand side.


3.  Turn the folder ninety degrees and fold that same left hand edge up until the flat line (NOT the tab) of the folder is aligned with the natural center fold of the folder.  Your folder should now look like this.


4.  Flip your folder over to the back side.


5.  Line up the folded edge on your scoring board and score along the crease for the last page of the planner.  Flip your folder back over and use your bone folder to smooth this last fold into place.


 6.  This is what the completely scored project will look like.


7.  And this is what it will look like when folded up.

I'd like to enter my card into the following challenges:
Crimbo Crackers--Anything but a card
Delightful Challenges--Anything but a card
Little Red Wagon--accordion fold
Make It Monday--anything goes

Hope you have a great rest of the week!

Supplies:
Paper--K & Company "Yuletide", Tim Holtz grunge board, Pendaflex manila file folder, Copic XPress-it Blending card
Stamps--Mo's Digital Pencil "Little Elf Kit", sentiment from Hero Arts
Ink-Vintage Photo and Walnut Stain Distress inks, Versamark, Memento Rich Cocoa, Micron Sepia pen
Copics Used:
skin--E000, E00, E11, E13, R20, R30
hair--E21, E23, E27
clothing--C00, C0, C4, YG03, YG93, YG95, YG97, R27, R29, R59
star--Y28
Tools--Bow Easy, Tim Holtz Tiny Attacher, Memory Box Jingle Bell die
Miscellaneous--Stampendous Gold embossing powder, Celebrate It ribbon, Gold Stickles, glitter from my stash, Velcro

Tuesday, November 12, 2013

Wednesday Trends at TSG

I don't know about you but I have tons of paper pad scraps in my collection.  Today I'm sharing a trend and tutorial over at the TSG blog as part of my Trendsetter of the week hosting duties.  Starburst or sunburst patterns on cards and scrapbooking pages are pretty hot right now.  I've used it for this cute pup from the "Puppy Love" set for my card.


The technique may look complicated but is pretty simple and there are several ways you can use in on a card.  Just Google under either starburst or sunburst card and you'll see what I mean.
For my card I started with four 1.5" x 6" strips cut from my leftovers.  Each one of those strip was cut at a diagonal from corner to corner.  You will also need a base for assembling.  Just grab a simple piece of copy paper.  I cut mine a little smaller than A2 size because I knew I was going to  mat it, but if you want it to cover the whole front of your card cut it to that size.


Next you're going to start assembling the pattern.  I knew I was going to be adding a circle to the bottom left corner for my image so I traced the outside of my die so I could make sure everything else was completely covered with the strips.  I used a Two-way Glue pen to add a spot of glue just to help keep my pieces in place until I had them like I wanted them.


You can use whatever kind of adhesive you like.  I'm a liquid glue girl because of the humidity here in the south.  I used my brayer to get a nice smooth attachment.


Once all the pieces were glued down I trimmed the piece to get rid of the excess hangover.


Pop it on your card base and embellish as you want.  I added stitching to all my panels just cause I love to stitch on my cards, but it looks great either way.
     Here are a few challenges I'd like to enter:

Ladybug Crafts Ink TLT--use kraft cardstock
Digi Sketch Challenge--all for the animals
Love to Scrap--anything goes
Make It Monday--anything goes
Make It Monday with Kraft Outlet--use any sketch and KO items
Ooh LaLa Creations--stitching--real or faux
Scrapbook Blessings--sunburst card
The Squirrel and the Fox--animal antics

Hope you have a great Wednesday.  I'll be back Friday with an Anything But a Card project to share.

Supplies:
Paper--My Mind's Eye "Reunion", Bazzill, Kraft Outlet Light Kraft, Copic XPress-it Blending card
Stamps--There She Goes Clear Stamps "Puppy Love" and "Nutmeg"
Ink--Memento Tuxedo Black, Jet Black Archival, Sakura white and silver gel pens
Copics Used:
E21, E23, E25, E27, E93, C4, C6, C8, YG93, YG95
Tools--Nestabilities Standard Circles, Fiskars Circle Cutter, MFT Die-namics Fishtail Stax, sewing machine
Miscellaneous--Wal-mart buttons, Kraft Outlet Hang Tag String

Monday, August 26, 2013

An "Out of the Box" technique tutorial

     I have been on a roller coaster ride for the last week around here.  I had mentioned that my dad was having his second knee replacement surgery.  Well we thought everything was going fine and they sent him home after lunch on Saturday.  Around 7 p.m. he was running a high fever and was advised to go to the Emergency Room.  As anyone who's ever gone to the ER knows, it will NOT be a fast trip.  LOL  Well, the fever became the least of our worries because he went in to an irregular heart rhythm.  They ended up putting him in ICU and he's still there.  The cardio doc says it's nothing life threatening, but obviously needs to be brought under control.  Weekends aren't the best time to get lots of answers from the doctors so hopefully we'll know more today.  I'd appreciate it if you would keep him and us in your prayers.
     One of the comments on my "Watchin' the Flutterby's" card last week was a request to show how to do the Out of the Box technique.  There are lots of great tutorials out there on this technique, but since several of you asked for more tutorials I figured I'd throw my own version into the lot.  This is a very simple technique that can really add a lot of interest to your card.  So here we go.

1.  Supplies.  You'll need your stamped image, a die, scissors, and a pencil.


2.  Place your die, cutting side up, over your image and decide where you'd like it to be.  Placing the die cutting side up will make it a bit easier to judge where your cutting line will fall.


3.  With your pencil, lightly trace along the inside edge of the die next to the parts that will be sticking out.  You can trace along the whole inside circle, but it's not necessary.


4.  Here's what you'll have after the tracing.


5.  Remember, the line you just traced is NOT the cutting line.  You're die will cut a little less than an 1/8" further out from the drawn line.  In the photo you'll see that I penciled in a dotted line roughly an 1/8" out from my first line.  This isn't necessary, but it sure helps you to cut more precisely.  The arrows indicate where you will start cutting in.  It's necessary to cut straight in or you will have a visible cut line in your image edge.


6.  This photo show everywhere that I have determined I will need to cut.


7.  Time to cut!  If you follow the arrow down to the dotted line you should have an invisible cutting line when finished.  Simply continue cutting until you reach your original traced line.  That's as far in as you want or need to go.


8.  Once you've made all your cuts you'll be able to slip the die under the cut outs and line it back up perfectly with your inside pencil marks.  Make sure your die is now cutting side down.


9.  Run the image and die through your cutting machine.


10.  This is what you will end up with and then all you have to do is finish trimming around the hair and paw.


11.  You'll end up with a trimmed, ready to use image with some parts sticking Out of the Box errrr....circle.  hee hee


     Hope this was helpful.  Have a great week!

Tuesday, January 29, 2013

Don't rock the boat

     It's Trendsetter Wednesday at There She Goes so that means it's my turn to share a tip concerning one of the trends out in crafty land.  If you read my post Monday you'll know that I picked woodgrain for my trend this week.  You still have lots of time to play in our Monday Challenge with a woodgrain project.
     I'm sharing a little tutorial on how to create "wood planks".  This is the same technique I used on the doghouse mini I shared a while back.  So here we go with a technique on how to get a great woodgrain look.  Woodgrain papers are really hot right now, but you can create your own.  All you need is some strips of kraft paper and sepia or brown ink.  I cut my strips at 5/8".
    I staggered the strips so my stamping wouldn't be uniform, then just stamped from left to right leaving a small blank space in between stampings.  Excuse my dirty craft sheet.  It's WELL loved.
     Once all my strips were stamped I started to glue them down in a random pattern on a circle of card stock.
     When finished I trimmed the edges.
 I used the stamped woodgrain panel to create a background for the porthole through which you can view the two cuties in the boat from the Float My Boat set from Torico.
     I dug back in to my brad stash for the nails and found some jute also.  the stars were cut from chipboard and covered with red embossing powder with fine gold glitter in it.  I added the decorative panel to a easel card base to finish off the nautical theme card.
     Like I said, I used this same technique on the Doggie Mini Album I made using the Puppy Love set and it can be used with lots of other great There She Goes sets.  Hope you'll give it a try.
     I'd like to enter this card into the following challenges:

Party Time Tuesday--anything goes
Cards for Men--transport
Lexi's Creations--fancy folds
Love to Create--anything goes with a sentiment
Make It Monday--anything goes
Paper Playtime--use some brown
The Paper Girls--wood elements
PanPastelUK--seeing stars
Allsorts--masculine
Fussy and Fancy--circles

     Have a fabulous day!